Posts

Strict Report

Image
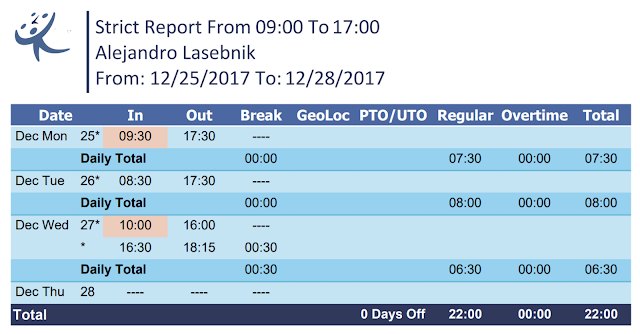
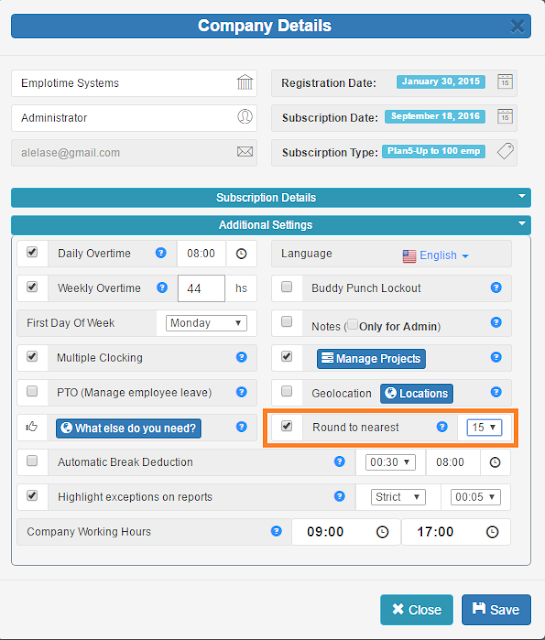
This special report is good for a company that needs to calculate employee work time effectuated only between the company working hours. This report calculation will truncate working time outside the working hours. As an example, if the company working hours are from 09:00AM to 05:00PM, and on a given day, an employee worked from 08:30 to 17:30 (a total of 9 hours), the report will only consider 8 working hours. This report will disregard the working time of the employee arriving early and/or leaving late. In order to be able to print out this kind of report, go to your admin portal (If you don't have an account you can create one now ) and click on the "Company Details" button. Here you will need to select the feature "Highlight exceptions on report" and select the strict exception.  Read more about exceptions on report here After selecting this feature you will be able to run the Strict Report from reports. Just click on the Reports button and

Employee Scheduling

Image
Emplotime offers an employee scheduling feature at no extra cost. As a manager you can manage your company schedules fast and easy. The employee scheduling process is really simple, you add the employee tasks in the Emplotime calendar and these will be shown at the employee clock page, this way, your employee will be able to see the tasks you have assigned for him. In order to schedule a new task, from your administrator portal, click on the "Company Details" button and then click on the "Manage Schedule" button. At this point the calendar will open and you only need to select the required employee to start scheduling tasks for him. If you have selected to "Show Calendar at Employee Clock Page" the employees will be able to click the "Calendar" button from the clock page and see whatever tasks you have assigned for him in the Emplotime calendar. Do you have questions? Contact the Emplotime support team . It is free!

How To Track Employees Who Work On Different Time Zones

Image
This is about simplifying time-tracking for companies that operate in multiple time zones. Our time clock solution allows you to authorize time clock use  at different locations by selecting the corresponding company branch. So if you have employees working on the pacific time zone area and others working on the eastern time zone area, you will designate the matching time clock for each location. If you haven't created your emplotime account yet, you can do this in seconds and for free. Start Your Emplotime Free Trial Now, let's explain step by step how you do it: STEP 1 of 3: CREATE YOUR COMPANY LOCATIONS Go to your administrative portal , and click on the Company Details button, and then click on the "Locations" button (At the Geolocation feature). See screenshot. Note: At this point, you don't need to select the Geolocation checkbox. The Geolocation checkbox will be selected only if you need to receive the geo-position of the employee

Time Clock Time Format

Image
This small article explains how to change the time format of your company time clock between the 12hs time format (i.e.: 04:00 PM) to the 24hs time format (i.e.: 16:00). As any other feature, you select it from the company details from your administrative portal. After selecting your preferred format, all your company time clocks will be automatically updated to visualize the employee punches in the selected time format. Time Format Feature Selection The company time clocks will display the selected time format as shown below. See screenshots. 12hs Time Format 24hs Time Format Note: The time format feature will not affect the fixed time format for reports. Click to start a free trial on Emplotime

The 3 features any time and attendance application needs

Image
In this article, you will find the 3 item list of must have features that needed to be included in any time and attendance application  you can find on the web. And yes, I said web, since today all the best time clocks or time and attendance applications are in-the-cloud, so you actually don't need to install anything. All is accessible from your browser. Having said so, we need to understand now, the entities or building blocks of this kind of solutions. There are basically two. One managed by the employer and the other by the employee. From here, it is easy to understand that we are talking about the time clock, where the employees will be able to clock in and out, and the second block, which is the administrative portal where the employer can see the employee's time sheet, add employees, update transactions, print reports, etc.  Let's find out the must have features for any time and attendance! 1. Buddy Punch Lockout The buddy punch lockout, also called &

Rounding to nearest minute

Image
The rounding to nearest attendance feature, allows the administrator to obtain reports with rounded transactions and totals, to the nearest minute selected; it will be 5, 10, or 15 minutes. In order to apply this feature, select it from the "Additional Settings" within Company Details. See screenshot below. Round to nearest 15 minutes After selecting this feature, all reports will be printed out with the selected rounding. Check the transactions below to see how will be outputted without and with rounding selection, No rounding selected Rounding to nearest 15 minutes selected

Attendance Project Feature

Image
One of the biggest features just released on Emplotime version 3.4 is the Project Feature. After activating this feature, the employee will be able to report the project in which he is working on. So this will allows the administrator to print out detailed information of an employee working on different duties. In this short article, I will explain in three steps, the full flow from activating projects on Emplotime to print out the "By projects reports": STEP 1: Activate And Manage Projects STEP 2: How Employee Reports His Duties STEP 3: How Administrator Obtain This Info ...And now in detail STEP 1: Activate And Manage Projects Enter your  administrator portal , click on Company Details button and check the Manage Projects checkbox. See screenshot below. Then, click on the "Manage Projects" blue button and add the company projects/jobs/duties. See screenshot below. STEP 2: How Employee Reports His Duties Since the administrator se