Posts

Time Clock Time Format

Image
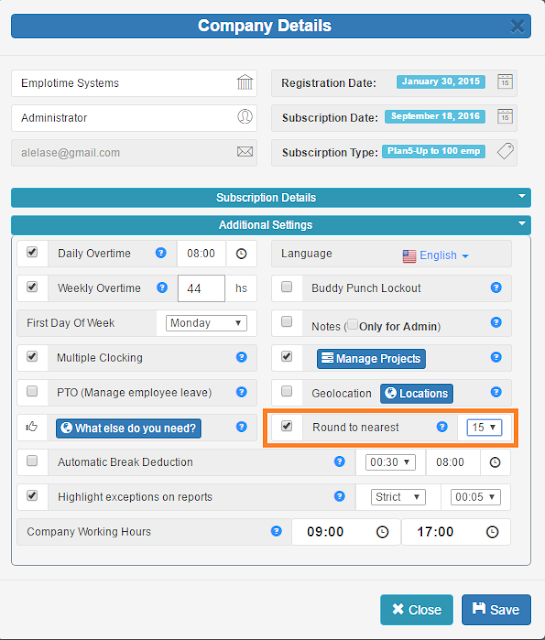
This small article explains how to change the time format of your company time clock between the 12hs time format (i.e.: 04:00 PM) to the 24hs time format (i.e.: 16:00). As any other feature, you select it from the company details from your administrative portal. After selecting your preferred format, all your company time clocks will be automatically updated to visualize the employee punches in the selected time format. Time Format Feature Selection The company time clocks will display the selected time format as shown below. See screenshots. 12hs Time Format 24hs Time Format Note: The time format feature will not affect the fixed time format for reports. Click to start a free trial on Emplotime

The 3 features any time and attendance application needs

Image
In this article, you will find the 3 item list of must have features that needed to be included in any time and attendance application  you can find on the web. And yes, I said web, since today all the best time clocks or time and attendance applications are in-the-cloud, so you actually don't need to install anything. All is accessible from your browser. Having said so, we need to understand now, the entities or building blocks of this kind of solutions. There are basically two. One managed by the employer and the other by the employee. From here, it is easy to understand that we are talking about the time clock, where the employees will be able to clock in and out, and the second block, which is the administrative portal where the employer can see the employee's time sheet, add employees, update transactions, print reports, etc.  Let's find out the must have features for any time and attendance! 1. Buddy Punch Lockout The buddy punch lockout, also called &

Rounding to nearest minute

Image
The rounding to nearest attendance feature, allows the administrator to obtain reports with rounded transactions and totals, to the nearest minute selected; it will be 5, 10, or 15 minutes. In order to apply this feature, select it from the "Additional Settings" within Company Details. See screenshot below. Round to nearest 15 minutes After selecting this feature, all reports will be printed out with the selected rounding. Check the transactions below to see how will be outputted without and with rounding selection, No rounding selected Rounding to nearest 15 minutes selected

Attendance Project Feature

Image
One of the biggest features just released on Emplotime version 3.4 is the Project Feature. After activating this feature, the employee will be able to report the project in which he is working on. So this will allows the administrator to print out detailed information of an employee working on different duties. In this short article, I will explain in three steps, the full flow from activating projects on Emplotime to print out the "By projects reports": STEP 1: Activate And Manage Projects STEP 2: How Employee Reports His Duties STEP 3: How Administrator Obtain This Info ...And now in detail STEP 1: Activate And Manage Projects Enter your  administrator portal , click on Company Details button and check the Manage Projects checkbox. See screenshot below. Then, click on the "Manage Projects" blue button and add the company projects/jobs/duties. See screenshot below. STEP 2: How Employee Reports His Duties Since the administrator se

Emplotime iPhone or iPad App

Image
As an administrator, you are able to access your administrator portal from your iPhone mobile device. In order to use Emplotime as a standard app, you first need to open "Safari" browser, and go to https://www.emplotime.com , then click on login and click on the share button of the safari browser  (rectangle with an arrow pointing upward), finally click on "Add to home screen" to save the Emplotime icon just like any other app. The same process can be used to add the Emplotime Clock as an application for the employees. Let's see now, step by step, how you can achieve this easily... Step 1: Open Emplotime in Safari Open Safari app and browse to Emplotime at https://www.emplotime.com/ , then tap login and click on the share button. see screenshot below. Step 2: Add to Home Screen Search for the "Add to Home Screen" button and tap on it. The Emplotime icon will show up on your iPhone or iPad now! Step 3: Open the Emplotime App

Exception Reports

Image
Emplotime Version 3.3 is out! A new feature allows to highlight exceptions on all reports. You will be able to choose from two different exception types: 1) Strict 2) Global STRICT You may select Strict exception in case you require from your employees to arrive and leave at a specific time. So in case the employee arrives late, the reports will highlight the entry "on red" to know about the "Late Entry". see screenshot bellow. Late Entry In short, strict type will highlight "late entries" and "early exits". GLOBAL In the other hand, Global type will be selected when you only require from your employee to work a specified amount of working hours. In this case, the "total" will be highlighted if the employee works less than required. see screenshot bellow. Global Exception In order to configure the required exception, you only need to open the "Company Details" from the Administrator Portal, and se

Night shifts overnight reports

Image
We are already working  on the Emplotime version 3.3 which apparently will include Projects and Exception Reports , however, in the meantime we have released a small version. The version 3.2 recently released is packed with some goodies related to employee working hours reports. This new feature is going to be very handy for those companies having employees working overnight. The filter reports now includes the possibility to check the "Enforce Overnight" checkbox. By selecting this checkbox, the output report will maintain the whole transaction within the same day. (Preventing of getting it separated in two different days). For example, if Tom clocked In on Wednesday at 10:00 PM, and clocked out at 05:00 AM in the following day, the entire transaction will be recorded for Wednesday.